This post is taken from the 3rd chapter of the free e-book Microsoft Lync Server 2013: Basic Administration – Release 2.1
The Lync Control Panel is the first administrative tool you’ll head to after the Lync installation is complete. Around 80-90% of all the administrative tasks can be managed with this graphical interface (the remaining operations will be limited to the Lync Server Management Shell that I will explain starting from chapter 5).
This chapter is ideally split in two base topics:
- An high level overview of the Control Panel and of some fundamental concepts of Lync administration (policies, policy scopes and administrative roles)
- A complete explanation of the user configuration parameters available in the Control Panel, including pool assignment, SIP URI configuration, telephony options and policy assignment
Introducing Lync Administration from the Control Panel
If you are not a PowerShell expert and if your Lync deployment does not require frequent troubleshooting, the Control Panel is the tool you will use more often in the day by day administration of Lync.
The first operation you will usually perform in the Control Panel (and the one that is suggested by default) is to enable users to Lync. The aforementioned operation may sound logical if we ignore one basic fact: the configuration your user will receive is based for a large part on Lync policies and rules while his / her Enterprise Voice configuration will depend largely on the dial plans and voice routes you will deploy in your company. So the unspoken assumption here is that before enabling the first user you should have all the required settings already in place and the planning for voice, workload balancing and so on done by this time.
My personal experience says that usually (for a lot of good reasons) you will have to enable users to Lync and later modify the user settings accordingly to the configurations you will deploy in a second moment.
So let’s examine some of the steps you need to take if you’re going to enable our users (Patricia Johnson, Peter Duggan and Julie Penny) to Lync keeping in mind their different needs. Summarizing what we said about here in the 1st Chapter, they will Enterprise Voice (for Julie with the external access prefix configured, for Peter with delegation), mobility, conferencing (with gallery view feature for Patricia) and federation with an XMPP external provider (again for Patricia).
Choosing Between the Control Panel and the Management Shell
A decision you need to make before you begin the actual work is about what tool you will use. As I said at the beginning of the chapter, Lync 2013 enables management from a graphical interface (Lync Server Control Panel) and a command line (Lync Server Management Shell). Managing with a GUI is easier, but for example, if you are going to enable a large number of users with a batch modification, the best tool it the Management Shell.
The Control Panel may be confusing because you will have all the administrative interfaces available, including ones related to features that you have still not deployed (and ones that you will never use). Looking at the next image, for example, you see the Persistent Chat tab in the Control Panel of a Lync deployment that does not have persistent chat enabled.
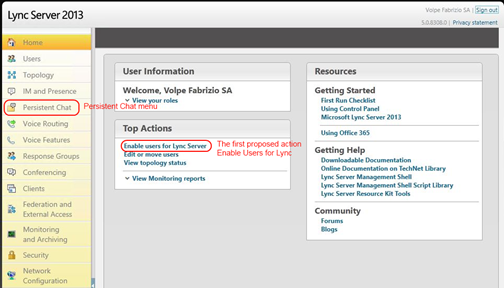
Figure 3.1 The Home screen of the Control Panel
Now, before actually doing administrative operations, let’s translate the information we about Patricia in a list of Lync parameters: she will need a telephone number, reachable from the public telephone system with an internal extension (I will use 1(555)555-5555 and her extension will be 5555). The company dialing habit is to add the 9 before dialing an external number and we want to keep this pattern. Patricia will be enabled for the advanced voice features, including call transfer, simultaneous ringing, and so on and from the video conferencing point of view she will use also the gallery view (multiple simultaneous video streams).
Policies and Policy Scopes in Lync Administration
The whole Lync experience of our users will be dictated by the policies we apply to them, to the Lync site (i.e. network location), to the Lync Pools and to the organization as a whole.
When your scope is to create a configuration or constrains for the larger part of your users it is advisable to use a global policy. The default policies that Lync applies just after the installation phase are all global ones. Let’s say, for example, that Lync2013.Org has an internal policy to deny delegation (a feature that enables users to specify other users to send and receive calls on their behalf). To address a requirement like that we will work on a global policy (a Voice Policy with a global scope, to be more specific)
As said, policies apply in a hierarchical order, which is illustrated in the schema below:
The policy will apply to all the Lync infrastructure (see figure 3.2)
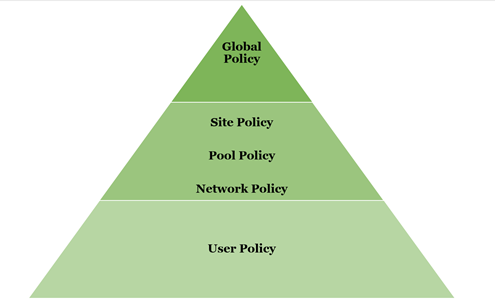
Figure 3.2 a global policy with delegation not enabled
Few Lync users like Peter Duggan (that will delegate to Julie Penny) will have access to the aforementioned feature. To create an exception to the rule you will create an additional Voice Policy (with scope = user) and then you will be able to apply it to the requiring users. We are going to define a new voice policy to respond to this need in figure 3.3
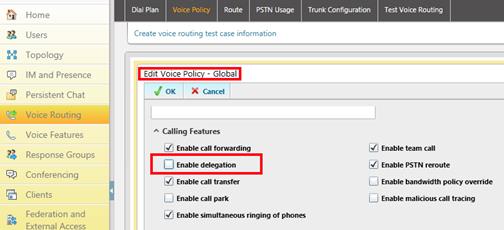
Figure 3.3 selecting the scope to create policies that will be applied to specific users
If you had a branch office with a lot of users in need of the delegation feature, you could have used the third scope (site) that applies to all the users in a specific Lync site. The more specific policy overrides the others to allow a granular management (i.e. conflicting parameters will be resolved by the User policy “overriding” the Site policy and the site policy replacing the Global policy parameters).
As a consequence, the network aspect of your deployment will influence your Lync administration; this is obvious because if you have a single site, you will lose a level of “flexibility” when managing your policies.
Roles in Lync Administration
Role Based Access Control (RBAC) is the permissions model used in Lync 2013. During the forest and domain preparation that is mandatory for the deployment of Lync, some universal groups are created and permissions are assigned to them.
The aforementioned groups are the base of RBAC and enable you to control what administrators and end-users can do. The division between Lync roles and other administrative tasks (like Directory Services administration) is so net that just after the domain preparation you have to insert at least one user in the CsAdministrator group, to define the first administrator of Lync 2013.
Each RBAC role is associated with a set of Lync Server Management Shell cmdlets corresponding to the tasks that can be carried out by users the users in a specific group.
Let’s try to imagine a scenario: Lync2013.Org wants to delegate to a group of operators the monitoring of Lync health. The only operation that the Lync administrator will need to perform is to insert their users in the CsViewOnlyAdministrator group (the tool to use is Active Directory Users and Computers, there is no way from Lync to perform this task)
Try It Now
We said that the groups have a limited subset of cmdlets available. To verify what commands every group is able to perform you can use the following string in the Lync Management Shell
Staying with the aforementioned example, you can launch the following line
GET-CSADMINROLE -IDENTITY "CSVIEWONLYADMINISTRATOR" | SELECT-OBJECT -EXPANDPROPERTY CMDLETS
The result will show a list of the cmdlets related to the CsViewOnlyAdministrator group.
You can try the same command with CsAdministrator and see the differences.
Enabling And Configuring Users
In figure 3.4 I have divided the New Lync Server User screen into four “zones”:
- Pool assignment
- SIP URI configuration
- Telephony options
- Policy assignment
I will use the aforementioned division to separate the different tasks related to user parameters that you have at your disposal to configure your users (later in the chapter, we will do the same thing for clients and devices).
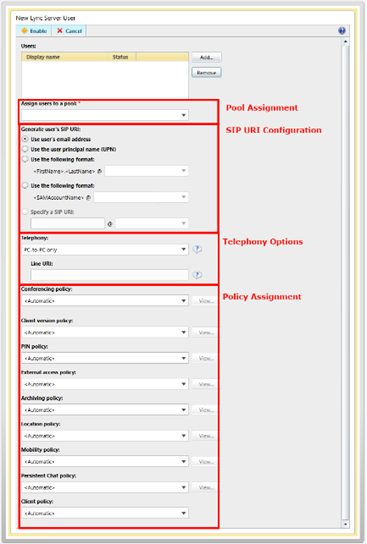
Figure 3.4 The New Lync Server User page with the options divided into four “zones”
Enabling a User to Lync
Let’s take a look to a standard process to enable to Lync one our users, Patricia Johnson.
We want to give her a Lync user that matches with her mail address, to assign her to the Lync pool that is located in the company’s headquarter and to give her a phone number that is directly reachable from the public telephony system 1(555)555-5555.
She will use the Lync capability to view multiple video streams in a single conference (gallery view) and she required to simplify her access to public IM services like Jabber.Org (at the moment she has many different accounts on the various systems). Patricia and her colleagues have used for many years a PBX that required dial 9 before you were able to compose an external number. We want to accommodate also this dialing habit.
We can start from the Control Panel, Users tab and select Enable Users
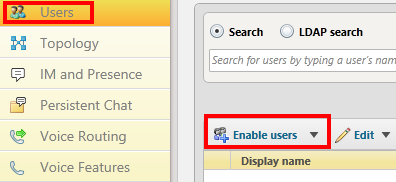
Figure 3.5 Starting with the enabling process
In the next screen select Add
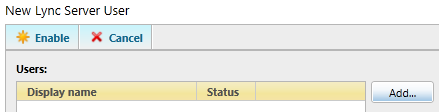
Figure 3.6 The New Lync Server User screen
In the Select From Active Directory screen you are able to search the user with a search or you can simply press the Find button and have a list of all the Active Directory users not enabled to Lync. Select Patricia Johnson.
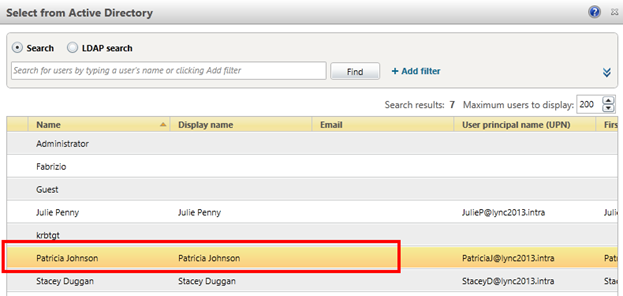
Figure 3.7 Starting with the enabling process
Pool assignment
Several parameters are already set to automatic, meaning that the Global policy will apply as long as we do not decide otherwise. The first area is used to decide which pool will host the user account (Patricia Johnson) as you can see in the following screen capture (figure 3.8). The information related to the pool in which the user is “homed” are shown in the first part of the menu and are important, for example, if we need to move our users from one server to another one in case of a disaster recovery.
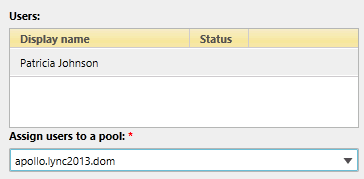
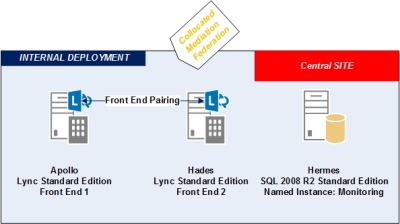
Figure 3.8 Assigning the user to a Standard Edition server
In Lync 2013 the so called Front End pool is in charge of a great part of base Lync functionalities including authentication and registration. A Front End pool could be constituted by a single Lync Standard edition server or by a group of Lync Enterprise edition servers (the suggested minimum is two servers for an Enterprise pool).
Every user enabled to Lync must be homed on a pool. If the pool contains more than one server, every person connecting to Lync will have a defined registration order (that is build and updated using an algorithm) containing a primary server, a secondary server and so on. The aforementioned mechanism balances the users on the pool “nodes” and gives continuity if one or more of the servers fails. If you have a geographical network with different Lync sites, the standard scenario is to have users homed on a pool that is on their local network, although this is not mandatory.
With the so called “brick” logic implemented in Lync 2013, we have an additional continuity feature (Front End pairing). If you have two separate pools, you are able to failover and failback the accounts from one Front End pool to another. This is not the same continuity level that you have with a single enterprise pool because you will have to manually fail users form one Standard edition server to the other one. However this method supports continuity (not high availability) because data are replicated in a way that permits the user to be moved with no information lost.
SIP URI configuration
Patricia Johnson has a mail address on our company’s Exchange system (PatriciaJ@lync2013.org ). She will be more comfortable if you enable her to use the same address to access also the Lync services( a feature called “unified communication”). Customers and partners will expect to contact her via Lync / Skype federation using the same mail address (reported also on his business card). A second reference, different from the aforementioned address, could be confusing.
As you know, Lync uses Session Initiation Protocol (SIP) as the signaling protocol. To citate the RFC 3261 “SIP is an application-layer control protocol that can establish, modify, and terminate multimedia sessions (conferences) such as Internet telephony calls. SIP can also invite participants to already existing sessions”.
SIP URI is the SIP addressing schema to call another person. In other words, a SIP URI is the software version of a traditional phone number based on the SIP protocol.
Each resource in an SIP network needs a unique URI (uniform resource identifier) and Lync is no exception. The second zone, “SIP URI Configuration” is where you can configure an SIP address for your user that must be unique in the Lync structure and should be as easy as possible to remember for both internal and external users.
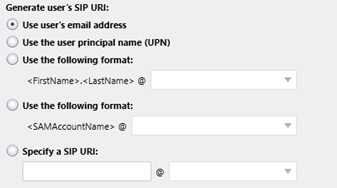
Figure 3.9 The SIP options available for every user
The available choices for the SIP URI depend heavily on the choices you make in the Lync Topology Builder. When you design (and publish) your Lync infrastructure, you are required to list all the SIP domains that your deployment will manage.
In figure 3.10 you can see the configuration related to the default SIP domain and to the additional ones you are able to add. SIP URI containing domains that are not existing here are not configurable in Lync Server 2013.
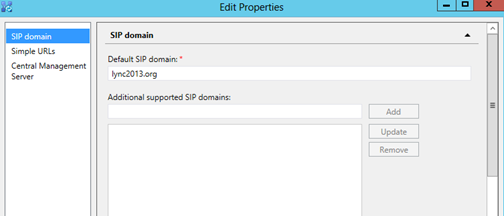
Figure 3.10 Adding or removing SIP domains requires modifications to the topology
If one of the SIP domains is also a public mail domain for the company, the “Use user’s email address” option should be your first choice.
The option to use the UPN (user principal name) has been widely used, but if your Active Directory domain uses an internal name, the limits on the third party certificates that will be effective on November 2015 make this option less convenient than it was in the past. The remaining options add flexibility to give you the possibility to use a SIP URI naming scheme that matches your company’s needs.
Telephony options
In the third zone, telephony options, four settings are available in the first drop-down menu as you can see in figure 3.11.
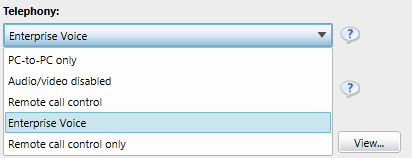
Figure 3.11 the Telephony drop-down menu
- Audio/video disabled implies that the user cannot make calls with audio and video and is limited to Presence and IM only
- PC-to-PC the user can make only PC-to-PC audio or video calls.
- Enterprise Voice enables the user to take incoming and place outgoing voice calls (this feature requires a specific Client Access License that you will need to buy in addition to the server license, as I will explain later in the chapter). Remote call control has two different settings
- Remote call control enables the user to remote call control. There are two option, Remote call control and Remote call control only. If RCC only is chosen, the PC-to-PC call feature is disabled.
All parameters (excluding Audio/video disabled) require a Line URI (the telephone number of the user).
Patricia requires full Enterprise Voice features and a number reachable from the public telephonic system, 1(555)555-5555.
The first parameter we need is a Line URI. We said that Lync is based on the SIP protocol, so you have to format it according to the ITU-T recommendation E. 164 (tel:+15555555555).
Such a format includes a country code, an area code, and a local user number and it is required to put Lync server 2013 in a position to talk (also) with the Public switched telephone network (PSTN) and with the outside world in general. Enterprise voice will be explained in greater detail later in the book.
The aforementioned number may be directly reachable from outside the company (this is called DID, Direct Inward Dialing) or may be an internal number that requires calling a main number. In the latter scenario, we have support for an additional parameter, ext. The Line URI will look like the one in the figure 3.12, where the extension is 5555.
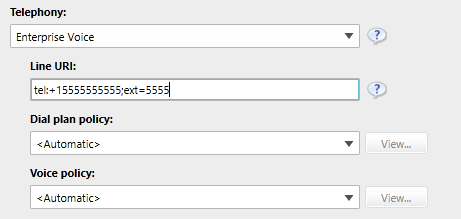
Figure 3.12 Configuring a user DID with extension
Dial plan policy
The Dial plan policy and the Voice policy will add some parameters we need to manage an Enterprise Voice user.
The Dial plan policy resolves a common issue: you need to normalize the numbers (for example, the ones that a user dials) so that they are transmitted to the voice gateways or SIP trunks in E. 164 format. A Dial plan contains one or more normalization rules that you can apply to a site, a pool, a user, or to the whole Lync system (the default Global policy).
Normalization rules are created using regular expressions such as “$ match the end” (a topic we will explore in the Enterprise Voice part of the book).
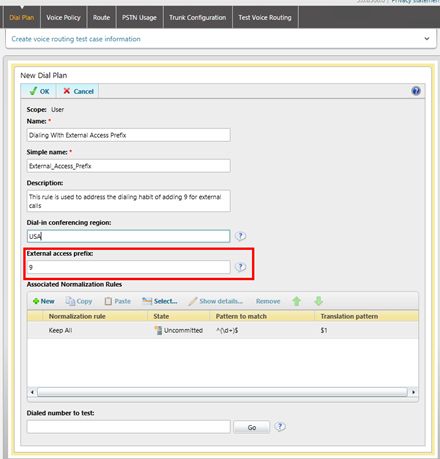
Figure 3.13 Configuring a dial plan with an external access prefix
In the figure 3.13I have added also an “External access prefix” (9) that’s often used for calls going outside the company.
This parameter is useful if your user’s dialing habit includes adding a number to identify calls that are going outside the company. Our user Julie Penny usually uses a desktop phone and composes telephone numbers after she has lift the receiver off the hook (off-hook dialing). She adds 9 at the beginning of the external number (a habit she has learned with the old company’s PBX) and then reads the number and composes it. The external access prefix says to Lync that 9 will be used for external number (so rules for internal numbers will be ignores) and that the number 9 is not to be considered when normalizing the number.
Voice policies are made up from two “parts”: features (that you can enable or disable) and PSTN Usage records, as shown in figure 3.14
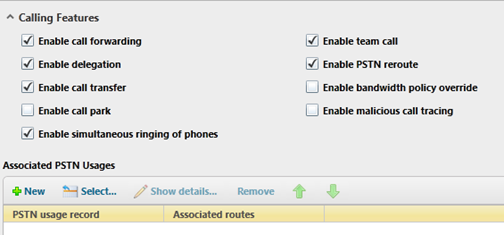
Figure 3.14 Editing a Voice policy
The previous screen capture shows the default configuration for a voice policy. For our user we will enable also the call park feature (that is, the capability to leave a call “waiting” and pick it up from another phone). The PSTN records are labels that we use to group rules needed to manage call costs and voice routing. We’ll talk more about Enterprise Voice in the third part of the book.
Earlier, we mentioned Lync CALs. Lync licensing is honor-based, so there is no control or limit on the features you are able to use even if you haven’t acquired the necessary licenses and you have no dedicated screen or configuration to add or remove licenses. The only way you have to keep control over the number of required licenses is with the policies you assign to Lync users, adding or removing features.
Policy assignment
We said that Patricia will use a feature called Gallery view. This is a new conferencing layout that features up to five active video streams at the same time. The “Allow multiple video streams” parameter (enabled by default and introduced for the first time in Lync 2013) can be disabled in situations where we need to inhibit access to a conference that uses Gallery view. This is something we have to enable using a policy (that is, by working in the last area of the Control Panel). The parameters are set in the screen you see in figure 3.15 (in the Conferencing tab, editing the conferencing policy).
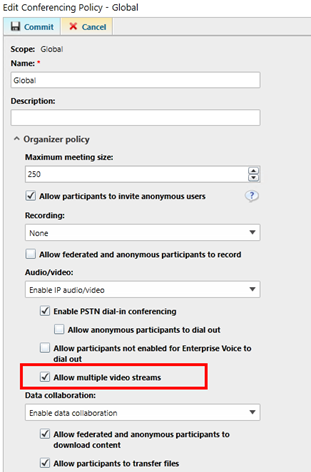
Figure 3.15 Editing the global conferencing policy to enable multiple video streams
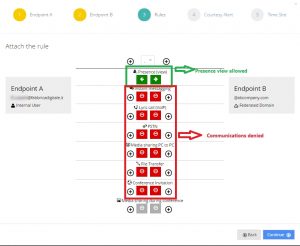
Patricia Johnson keeps in touch with a large number of customers of our company and she is often required to meet them on public IM services like jabber.org . You want to make it easy for her to connect with the aforementioned external services using her Lync account (and replacing with the latter a long list of accounts she uses on the various platforms). You can achieve the result configuring a federation based on XMPP. I will explain the details later, but basically what you need to do is to configure the policy in the Federation and External Access tab, editing the External Access Policy as shown in figure 3.16

Figure 3.16 Configuring a policy, with a scope limited to the user, for XMPP federation
It is important to point out that the policy will be a User scope policy, because we want that XMPP integration not to be a generally available feature.
Returning to the user’s parameters for Patricia (figure 3.17) we will bind her to the “XMPP Federation” policy, leaving the global/default policy with no changes.

Figure 3.17 Applying a User policy for Google Talk
The various policies we see in this screen will dictate the whole user experience and will be discussed deeper in the next chapters. To give you a quick idea of the available parameters, we have:
- Conferencing policy—Defines the features and capabilities that users have available during a meeting, including the audio and video features and the data sharing tools.
- Client Version policy—This policy defines for Lync the versions of clients that are supported in your environment.
- PIN policy—To participate in a dial-in conference, a Lync user requires a personal identification number (PIN). PIN policy dictates maximum logon attempts, PIN expiration, and so on.
- External Access policy—You can configure which public systems (including XMPP federated partners) or external users can collaborate with internal users.
- Archiving policy—Archiving enables your company to keep a record of IM conversations involving your Lync users. The aforementioned feature could be required for legal reasons and could be turned on only for specific users, with a dedicated policy applied to the people you need to track.
- Location policy—Location policy contains the E9-1-1 settings.
- Mobility policy—The features you can control from here are related principally to the Lync 2013 clients for mobile devices, e.g. Wifi Connection requirement for Video Calls from those devices.
- Persistent Chat policy—The parameters you can modify here are related to the persistent chat service.
- Client policy—The client policy dictates which client features will be available for the user.
As you’ve seen, even the configuration of a user that doesn’t have particularly complex requirements involves several steps. A user’s policies and configuration (especially projected on a large scale) have a deep impact on costs and on the performance of your system and are not to be undervalued.
Try it Now
Move a user from one Lync pool to another and to disable their conferencing policies using the Control Panel.
Lab
NOTE For this lab, you’ll need your domain controller and a Lync Front End up and running.
- Proceed to enable a new users in Lync
- Delegate to this user the capability to enable and disable users for Lync Server
- Launch the Lync Control Panel whit the aforementioned user and enable two new users to Lync
- Define their policies so that one of them is enabled only to IM while the other one is an Enterprise Voice user