Packt always gives away a chapter from its book.
This is the free chapter from my book Getting Started with FortiGate
Chapter 2: Filters, Policies, and Endpoint Security
After considering the FortiGate routing features, it is necessary to discuss its firewall functionalities. All the traffic that is received on a unit is analyzed using the Security Policies. As soon as a data packet is received, the firewall analyzes its source address, its destination address, and the kind of service it is related to. Based on this information, FortiGate tries to locate a matching security policy. If a match is found, the instructions contained in the policy are applied (while a data packet with no matching policy is dropped by default). The basic option available in the security policy is to accept or deny data packets. However, additional operations are available such as logging or UTM inspection.
Processing a data packet inside a FortiGate
The checks performed by a Fortigate unit can be summarized in four different levels of control. If any step inside the different layers containing a blocking rule is met, the data package would be discarded. These levels are as follows:
- Ingress: Ingress filtering controls the incoming traffic to protect the network from security risks. Controls related to DOS (Denial of service), IPSEC (IP Security) destination, and routing are performed at the Ingress level.
- Stateful Inspection engine: Stateful inspection enables the FortiGate firewall to maintain context with active sessions. If a packet is a part of an existing session, the packet will traverse the device with no additional control. If a packet does not match an existing connection, it will be evaluated according to the firewall rules. The Stateful Inspection engine includes user authentication, traffic shaping, session tracking, and policy lookup.
- UTM scanning: FortiGate units are pre-configured with the so called UTM profiles. The UTM security profiles include antivirus, webfiltering, Intrusion Protection (IPS), emailfiltering, and DataLeakPrevention (DLP). FortiGate units are pre-configured with several default UTM profiles, so we are able to use the default profiles or create custom profiles to match our company’s needs. We can use the Factory default content profiles information of our FortiGate to know more about the default profile available for a specific model.
- Egress: Egress is performed on existing data packets from the FortiGate unit. This kind of filtering can help contain botnet activities and performs security checks both on NAT sources, IPSECand routing. Also maximum bandwidth-use limits are enforced at the egress level. The following diagram shows a schema containing all these steps:
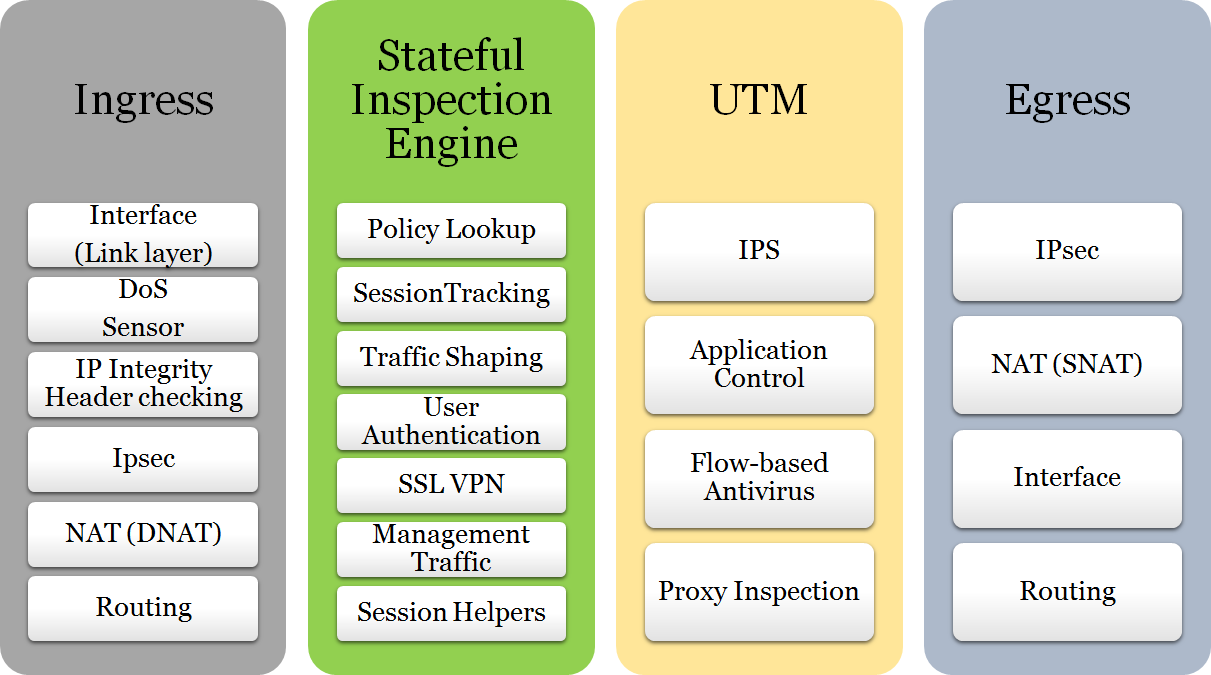
Depending on the security configuration and UTM settings, a packet could flow directly from the Stateful Inspection engine to the Egress layer.
Inside the UTM layer, the Proxy Inspection is an optional step that contains VoIP Inspection, Antivirus, Internet Content Adaptation Protocol (ICAP), Web Filter, Email Filter, and Data Leak Prevention controls. During this chapter, we will focus on the Stateful Inspection engine and on the UTM layers.
Firewall features
The primary use of a FortiGate unit is to protect our networks from attacks with its firewall features. The security policies will define the allowed network traffic. Now, let us take a look at a set of base objects that we will use to create and manage the policies.
Interfaces and zones
We have talked about interfaces in Chapter 1, First Steps. The firewall is able to operate both on physical and on virtual interfaces, including wireless interfaces, VLANS, and Virtual Domains (VDOM) links.
VDOM are a logical division of a single FortiGate unit into two or more virtual units that are independent from each other. We will talk about them in Chapter 4: High Availability.
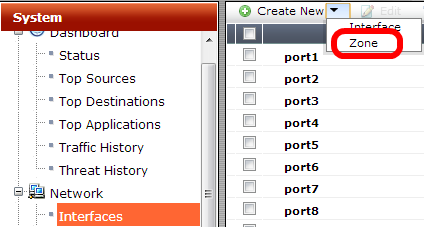
There is a firewall interface that will receive the network traffic and an interface from which the aforementioned traffic will flow out of the device. We are able to establish a “direction” in which data is moving. This is the basic type of firewall control, and we can combine multiple interfaces (including physical ones and virtual ones like VLANs and VPN tunnels) into a Zone. The idea is to avoid the duplication of polices by grouping interfaces that require the same security policies for incoming and outgoing traffic. To create zones navigate to System | Network | Interfaces inside which, you click on the Create New option and select Zone from the drop-down menu as shown in the following screenshot:
Now we are able to use a single policy with a zone as the source and another zone as the destination, rather than a policy for each interface.
In the zone configuration, we can select the Block intra-zone traffic option to prohibit the different interfaces in the same zone to talk to each other. In this scenario, if we need to enable interfaces in the same zone to talk to each other, we will have to create an explicit “allow” rule using the same source and destination zone.
Firewall objects
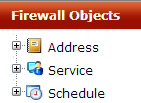
A FortiGate unit allows us to define firewall objects. The objects are reusable and we have the capability to combine them, and to configure policies employing the same object more than once. The object categories include Addresses, Services, and Schedule, as you can see in the following screenshot:
Addresses
An address object can comprise of a single IP address, an IP range, or a Fully Qualified Domain Name (FQDN). The use of a FQDN is useful to create rules for Internet servers and to manage policies in a large network environment, because the rules will always be up to date as long as the DNS server is able to correctly resolve the host name. To add a new address, we have to navigate to the Firewall Objects | Address | Address menu and click on New to get a screen as follows:
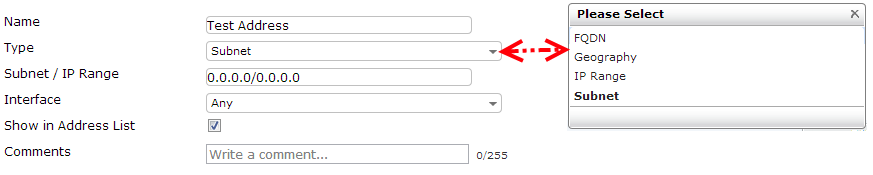
It is required to specify the interface that is associated with the address we are going to configure. The Any option is to be used if the address is reachable on more than one interface. A FortiGate unit also has the capability to group previously defined Address objects to keep our policies as simple as possible, avoiding rules duplication. Groups are created by navigating to the Firewall Objects | Address | Group menu and click on New to get a screen as follows:

More advanced addressing types, such as geography based addressing and wildcards (crated using a dedicated netmask) are also supported. More information is available in the following document: FortiOS Handbook – Firewall for FortiOS 5.0 at http://docs.fortinet.com/fgt/handbook/50/fortigate-firewall-50.pdf.
Services
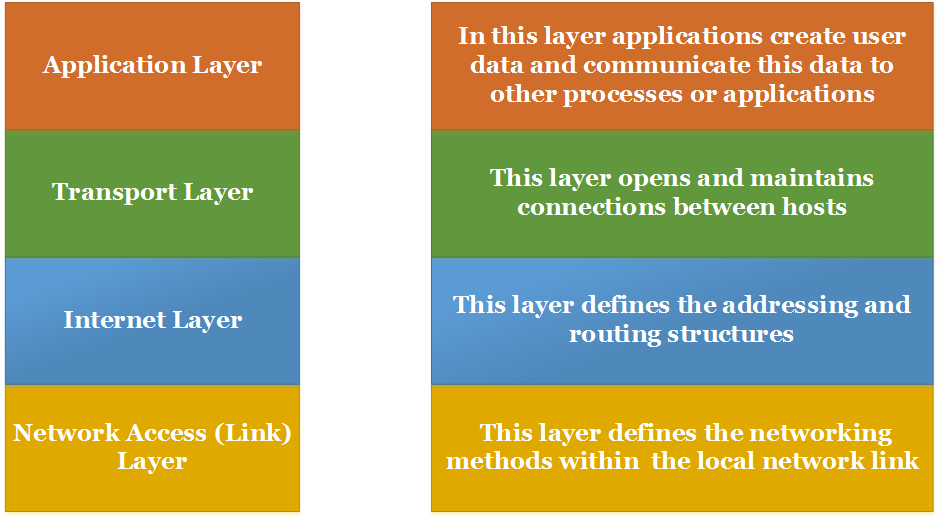
At this point of the text, our control of the network traffic has been limited to methods such as creation of VLANs and filters based on the source and destination address. The TCP/IP protocol is made up of different layers; each specialized in a specific task. Inside each layer we have one or more protocols dedicated to grant specific features. In the following diagram, we can see a simplified schema with a base explanation of the TCP/IP protocols stack. The aforementioned filters are limited to the Internet Layer.
Defining services allows us to apply controls based on the protocols used in the Transport Layer. For every connection there will be a 16 bit number called port that identifies a specific kind of service. The list of services that we are able to control include:
- Transmission Control Protocol (TCP): It is a reliable network service, which provides acknowledgment after successful delivery of data. It includes the repeat request functions which check whether all the data is correctly transmitted.
- User Datagram Protocol (UDP): It is a service that does not require handshake (prior generation of a session) and does not check for transmission errors. UDP prioritizes speed over reliability, delegating controls to the application layer.
- Stream Control Transmission Protocol (SCTP) provides features similar to UDP (it is datagram orientated) with sequential transport of data like TCP.
- ICMP (Internet Control Message Protocol) is a part of the Internet Protocol layer and is mainly used to diagnose and troubleshoot connection errors. ICMP uses value known as type to distinguish the different messages.
The information provided so far is functional to the explanation of the features of FortiGate. To know more about the TCP/IP protocol, a simple search on a search engine will provide a considerable amount of free resources.
A FortiGate firewall contains a list of default services, and by using them we are able to manage the most common scenarios. However in most cases we will likely need to define custom services to accommodate our particular requirements. In such a scenario we are able to define a custom service by navigating to the Firewall Objects | Services | Create New drop-down menu and selecting Custom Service. The configuration screen is shown in the following screenshot:
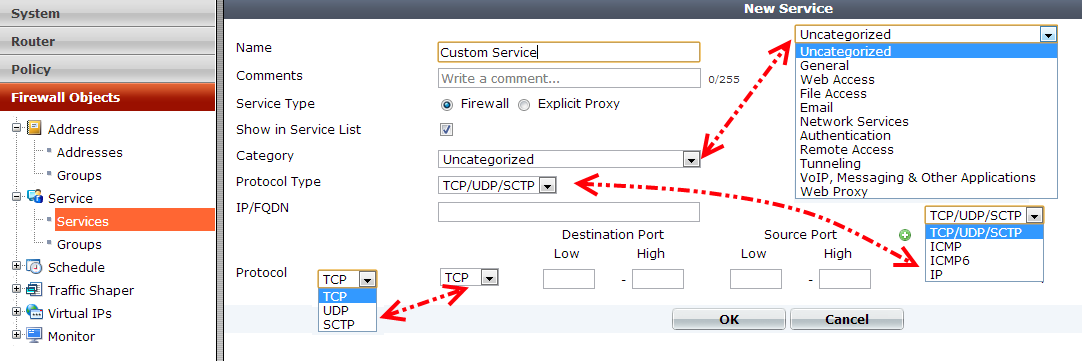
A group screen is available so that different services can be grouped together. This way we can enable or disable multiple services using a single policy. Groups are managed by navigating to the Firewall Objects | Service | Groups pane. In the following screenshot, we can see the configuration screen for a new group:

Schedules
A FortiGate firewall policy also requires us to explicitly set a time frame in which the aforementioned rule will be active. The default value is Always (meaning always active). The two types of schedules supported by FortiGate are as follows:
- Recurring: It enables us to activate the rule on a specific day of the week, on a specific range of days, and so on
- One-time: is usually applied to test policies or to policies that we want to make effective on demand for a limited number of occurrences
To give a real world example, some companies have a less restrictive policy during lunch time. We are able to create a policy dedicated to opening social networks and we will have to pair it with a schedule like the one we can see in the following screenshot:

By leveraging the objects that we have defined up to now (or defining new ones on request), we are able to generate one or more firewall policies. The policies are managed in the Policy | Policy | Policy pane. In the next screenshot, we have the New Policy configuration screen:
In the screen dedicated to policy definition, we have to select an interface. If we select an interface different from Any in the drop-down menu, only objects connected to the specified interface will be available to configure a policy.
UTM profiles
Unified Threat Management (UTM) creates additional control layers that examine the contents of the network traffic already permitted by the rules related to addresses, services, and schedules as mentioned previously. The UTM options can be grouped into a profile that we are able to apply to one or more firewall policies. In the following screenshot, we have the UTM menu of a FortiGate unit with the different UTM features shown.

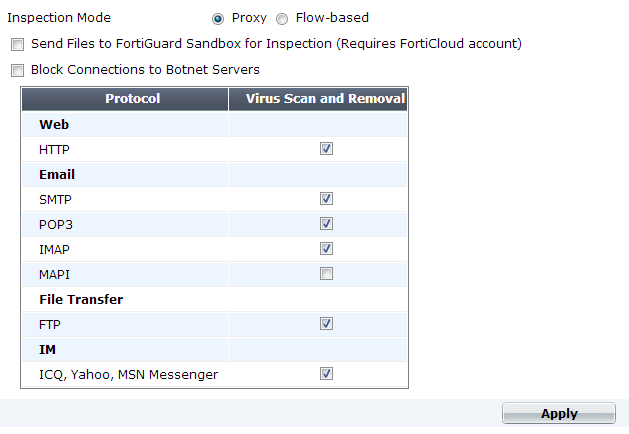
Antivirus
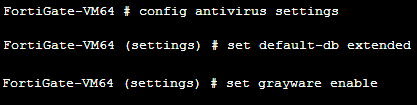
The Antivirus filter examines network traffic for viruses, worms, Trojans, and malware. The antivirus scan engine has a database of virus signatures that it uses to identify security risks. Depending on the FortiGate unit we are able to select between a regular virus database, an extended version containing “viruses that are no longer seen in recent virus studies,” and an extreme version that is able to filter viruses that have been dormant for a long period and that rely on older hardware and software. There is also an option to check for Grayware (applications or files not classified as viruses that may still negatively affect the computers’ performance). The antivirus database and Grayware options can be changed using the CLI as follows:
config antivirus settings | set default-db extended | end
config antivirus settings | set grayware enable | end
The result is shown in the following screenshot:
For more information on the config antivirus command, please refer to FortiOS.
CLI Reference for FortiOS 5.0 at http://docs.fortinet.com/fgt/handbook/50/fortigate-cli-50.pdf.
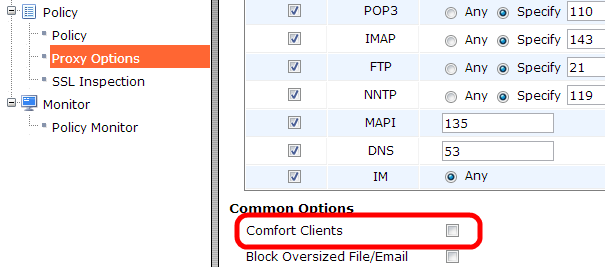
The most reliable method to scan for viruses is for the firewall to download an entire file and scan it once the transmission is complete. A replacement message will be sent if the file is infected. The client will have to wait till the antivirus scanning is completed. However, for large files, this could imply a long waiting time and the user could try to restart the download. To avoid such a scenario, FortiGate has a feature known as client comforting that slowly transfers the file in parts to keep the download “active” on the client side. As soon as the antivirus check is complete, the user will receive the complete file or the download will be interrupted if the file is infected by a virus. Client comforting can be configured by navigating to the Policy | Policy | Proxy Options pane that we can see in the following screenshot:
The antivirus profiles are configurations that we are able to apply in a firewall policy and define what the antivirus will control and how the antivirus engine will manage security risks. Antivirus profiles are managed by navigating to the Security Profiles | Antivirus | Profile menu. In the following screenshot we are able to see the configuration screen for a new antivirus profile:
Intrusion protection
The FortiGate Intrusion Protection System (IPS) monitors both network traffic and system activities for signs of malicious activities, protecting the network from protocol and application based attacks. IPS requires the following two configurations:
- A security policy to define the kind of network traffic we are going to control
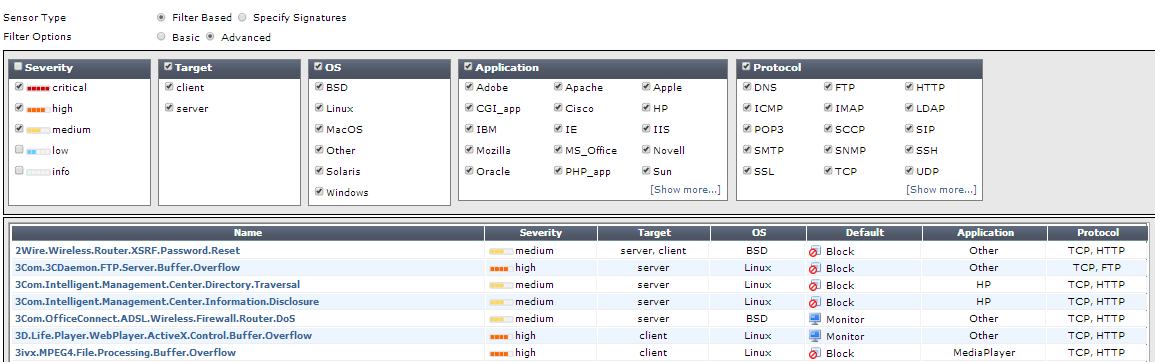
- An IPS sensor, that is a configuration to specify the signatures we want to use in a specific scenario (it is really resource intensive to enable all the existing checks together)
The steps required to define intrusion protection are as follows:
- Create an IPS sensor by navigating to the Security Profiles | Intrusion Protection | IPS Sensor menu as we can see in the following screenshot:

- Add filters and signatures to the sensor. This step requires to create one or more filters, or to use an existing signature shown in the following screenshot:
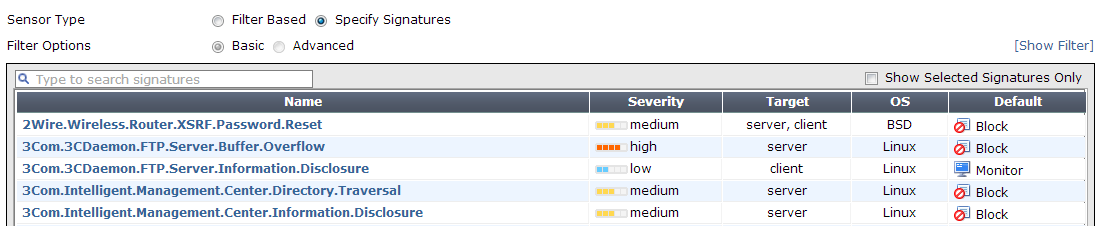
- Inside a filter we are able to specify IPS parameters such as the OS we want to control, the protocol, the application that we will check for threats and so on. Note that, for every signature there is a default action that we can override to create a filter tailored to our needs. The screen to configure an IPS filter is as follows:
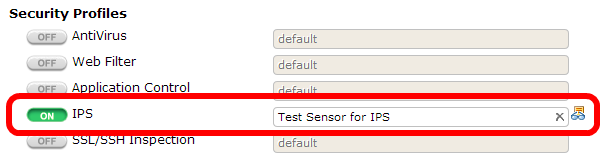
- Now, we have to select a security policy (by navigating to the Policy | Policy | Policy menu) , turn on IPS, and choose the IPS sensor from the list using the menu shown in the following screenshot
Web filter
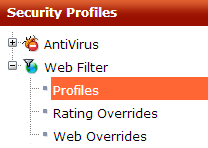
Web filtering is used to control the type of content (websites) that our users are able to access over the http and https protocol on the Internet. The menu dedicated to this kind of control is the Web Filter pane under the Security Profiles menu that we can see in the following screenshot:
The range of threats that web filters should cover is larger than blocking malware and includes controls used to prevent problems such as exposure of confidential information and avoiding legal issues due to illegitimate use of Internet resources. To obtain this type of protection, there are the following five levels of screening, all managed by navigating to the Security Profiles | Web Filter | Profile menu:
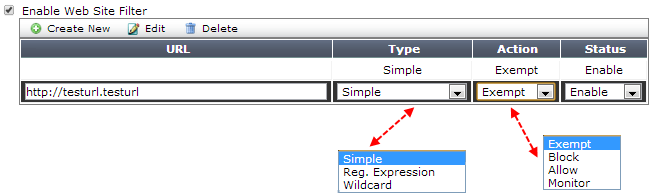
- URL filtering: We can block access to specific URLs or public IPS by adding them to the filter list. To define the URLs, the web-based interface provides a dedicated page that allows us to add filters and permits us to specify a path inside a website or to filter a wider range of URLs using wildcards (the page is shown in the following screenshot). Regular expressions (Regex) are supported too.
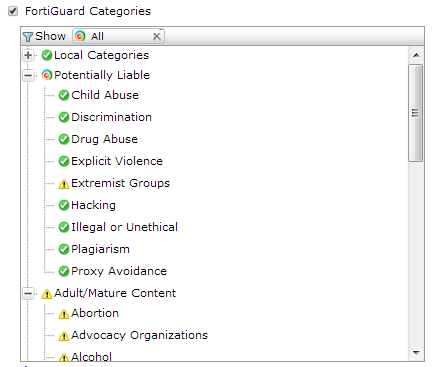
- FortiGuard web filter: It is a subscription service that classifies billions of webpages to make it easier to allow or block whole categories of websites. The FortiGuard filters have to be enabled inside a profile as shown in the following screenshot:
- Web content filtering: It blocks webpages containing specific words or phrases (including support for patterns, wild cards, and regular expressions based on Perl).
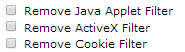
- Web script filtering: We can configure the FortiGate unit to block Java applets, cookies, and ActiveX scripts from the HTML webpages. Script filtering is managed inside the profiles as we can see in the following screenshot:
- Antivirus scanning: Its control is based on the same concepts we have explained in the dedicated paragraph, previously in this chapter.
To have a deep dive about UTM features of a FortiGate please refer to the following document: FortiOS Handbook Unified Threat Management for FortiOS 5.0 at http://docs.fortinet.com/fgt/handbook/50/fortigate-utm-50.pdf
Client reputation
Client reputation is a tool to track client behaviors and actions that could increase our exposition to attacks. This feature does not give a mechanism to stop the dangerous activities, but highlights them by enabling the administrator to apply security policies and controls as needed. Client reputation is enabled by navigating to the Security Profiles | Client Reputation | Threat Level Definition menu shown in the following screenshot:
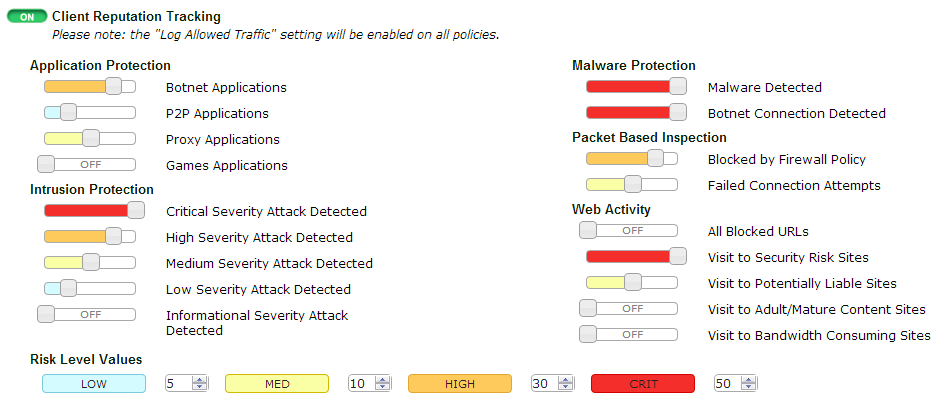
The controls we can be enabled include:
- Bad connection attempts, typical of BOT (an automated or semi-automated tool) activity
- Packets that are blocked by deny-security policies
- Intrusion protection, malware protection, application protection, and web filtering events
- Activities that include visiting websites in risky categories and consuming a high level of bandwidth
Traffic Shaping
Inside a security policy we are able to assign a Traffic Shaping configuration. The parameters include minimum as well as maximum levels of bandwidth to be able to guarantee QOS (Quality of Service). Traffic shaping is configured by navigating to the Firewall Objects | Traffic Shaper pane (shown in the following screenshot):
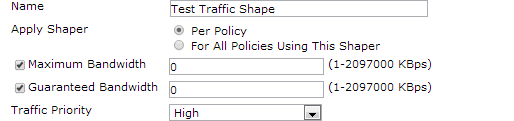
There are three shaping options available, which are as follows:
- Shared policy shaping: Bandwidth management by security policies
- Per-IP shaping: Bandwidth management by user IP addresses
- Application control shaping: Bandwidth management by application
More information is available in the document Traffic Shaping for FortiOS 5.0, available at http://bit.ly/1dlFHmA.
Security policies
Security policies will define which session matches with one or more rules in a set and the actions the FortiGate unit will perform. The list of elements that a FortiGate will check includes:
- Source Interface/Zone
- Source Address
- Destination Interface/Zone
- Destination Address
- Schedule and time of the session’s initiation
- Service and the packet’s port numbers
- UTM profiles
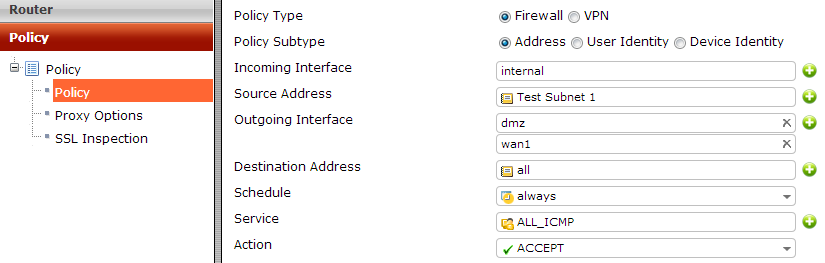
Based on the mentioned policies, a packet can be accepted or denied. Security policies are managed by navigating to the Policy | Policy | Policy menu. In the following screenshot we can see the screen used to edit a security policy:
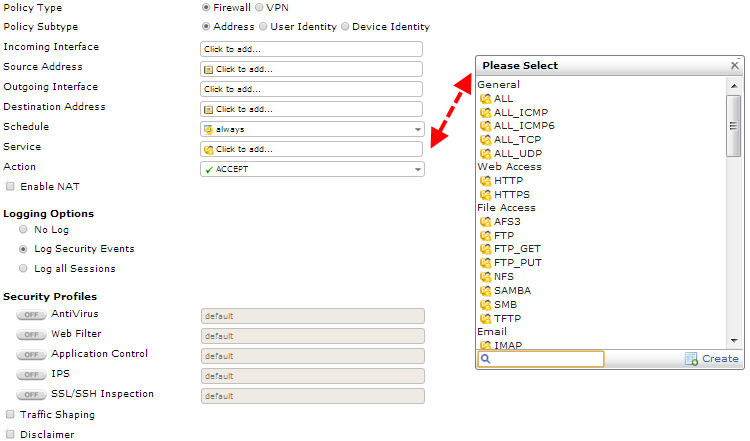
After we have defined a firewall policy, it will look like the following screenshot. Inside a single policy firewall, the controls will be applied in the order we have selected. The firewall policies are evaluated in order from top to bottom. The first rule to match a packet will perform the action specified by the matched rule.

More information about security policies and the features of FortiGate firewall is available in the FortiOS Handbook Firewall for FortiOS 5.0 (at http://docs.fortinet.com/fgt/handbook/50/fortigate-firewall-50.pdf).
FortiClient
FortiClient is an endpoint management software available in the following two versions:
- Standalone client: It is a free client that offers protection from viruses, malware and adware, parental control and VPN connection support
- Managed client: It is a client which requires a license and it adds to the previously mentioned features, a series of tools for central management, an application firewall, and a vulnerability scan feature
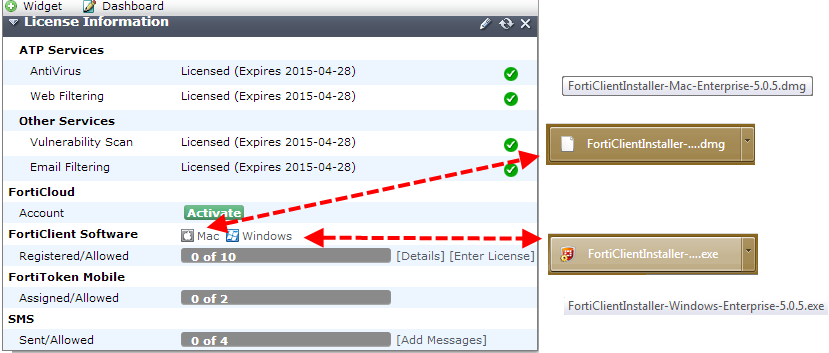
Up to ten managed clients are for free, then the number of clients that we are able to license depends on the type of FortiGate unit we are using. The client software is available for Microsoft Windows (Windows 8, Windows 7, Windows Vista, and Windows XP) and for Mac OS X (10.8, 10.7, and 10.6). On the FortiClient page (http://www.forticlient.com/) we also have apps for iOS (for iOS 5.1 or higher) and Android (Android 4.0 or higher). FortiClient can also be downloaded from the Fortinet Customer Service & Support page (https://support.fortinet.com/). In FortiOS v 5.0 Patch Release 1 or later, FortiClient installation files are available for download inside the FortiGate dashboard menu. By navigating to Selecting System | Dashboard | Status | License, we can select the Windows or Mac OS version as shown in the following screenshot:
Installation of the FortiClient software can be done manually or by using automatized methods such as Microsoft System Center or via the Active Directory policies.
FortiClient management
The first step required is to enable one or more interfaces on the FortiGate unit for Device Management. The option is contained in the interface configuration (navigate to the System | Network | Interfaces pane) as we can see in the following screenshot:
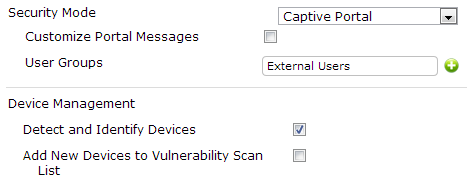
In the previously mentioned configuration page, we have an option (Security Mode) that adds a control on the endpoints. We are able to make an up-to-date installation of the FortiClient software, mandatory on the endpoint. Non-compliant devices will be restricted to a captive portal that provides a downloadable installer of the FortiClient. The captive portal is customizable to be tailored for our company’s needs. By navigating to the Policy | Policy | Policy menu, we can create a Device Identity policy to manage non-compliant devices and unknown devices (see the configuration page in the following screenshot).

We need to create one or more client endpoint profiles by navigating to the User & Device | Device | Endpoint Profile menu. A profile enables the management of all the client features, including antivirus, firewall, and VPN. The following screenshot shows the configuration screen for an endpoint profile:

Bring Your Own Device (BYOD)
The policies and configurations we have explained for the FortiClient software can be seen as a part of a larger management scope, dedicated to controls on personal mobile devices connected to our network. The full list of controls includes:
- Identifying and monitoring the devices
- Using the MAC address to control access
- Creating policies based on device type
- Enforce endpoint control using the FortiClient software
We have already seen the option (inside the interface configuration) to enable device monitoring. The resulting data is included in the Device definition menu under the Device tab in the User & Device option. In the following screenshot, we have an Android tablet and a Windows laptop connected to our FortiGate unit:

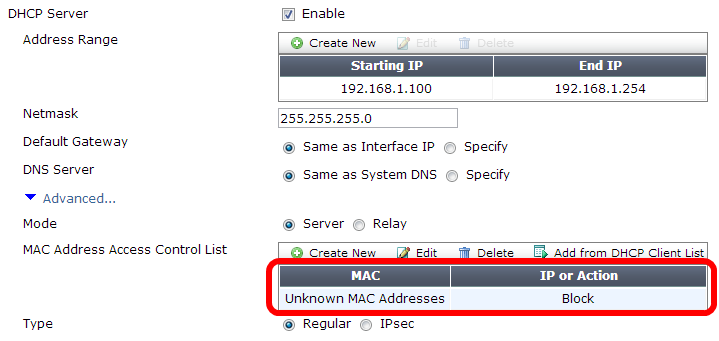
MAC filtering is useful to limit access to our Wi-Fi network. If we enable a DHCP server on our interface, the default value is to assign an IP address to any MAC. We are able to apply a stricter control changing the option for Unknown MAC Addresses to Block as shown in the following screenshot:
For more information about the FortiClient software a good starting point is the FortiClient Administration Guide (the last release is the v5.0 Patch Release 5 available at http://docs.fortinet.com/fclient/forticlient-admin-505.pdf). For BYOD and client reputation refer to the FortiOS Handbook Devices and Client Reputation for FortiOS 5.0 (at http://docs.forticare.com/fgt/handbook/50/fortigate-devices-client-reputation-50.pdf).
Summary
During this chapter we have introduced the firewall features of FortiGate and the tools dedicated to device management. UTM and the related security and profiles have been presented, and we have seen also a short explanation of the FortiClient software, that adds many administrative mechanisms for endpoint control. In the next chapter we will talk about expanding our network in a secure manner using VPNs and tunnelling.